
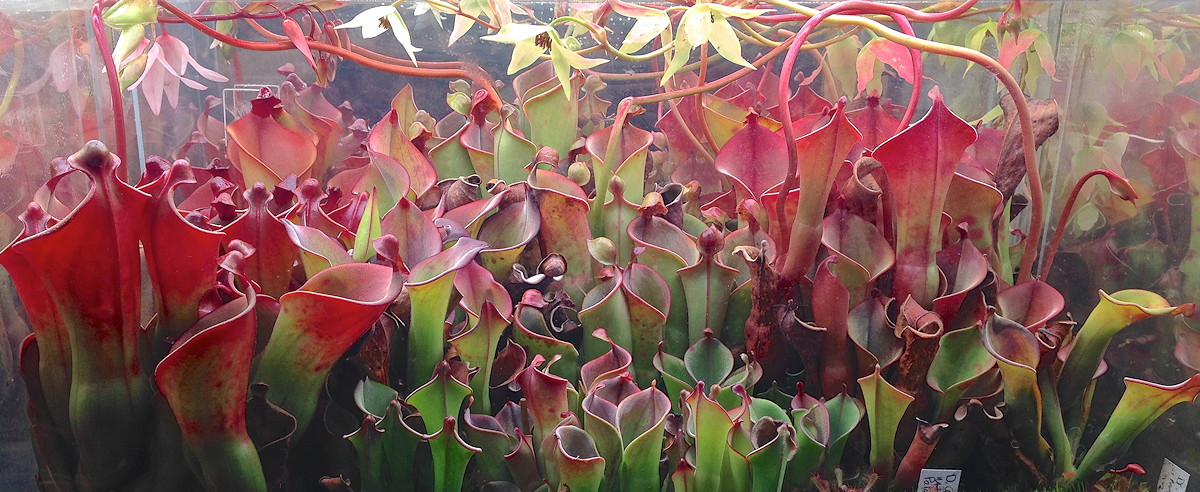
LEDs are cool. Heliamphora growing in a terrarium under LED lighting.
Heliamphora can be one of the easier carnivores to grow, or one the harder, depending on the conditions you can provide. Although Heliamphora was first in cultivation over 130 years ago, it was not until the 1990's with new clones propagated via sterile culture that Heliamphora became readily available. There has been a learning curve to understanding how to grow Heliamphora. Much of what has been written about Heliamphora culture is wrong or misleading.
There are at least 23 species of Heliamphora and many hybrids in the wild. The plants are found only in the Guiana Highlands of Venezuela and adjacent Guyana and Brazil. Most species are restricted to 1200 to 2800 m (4000 to 9200 ft) elevation on tepuis. A few species are on the tepui slopes or other highland areas above 800 m (2500 ft) elevation. The tepuis are sandstone plateaus that rise hundreds of meters above the adjacent landscape. Although the tepuis are a few degrees north of the equator, the temperature range on their tops is generally 7 to 23°C (45 to 74°F) with occasional higher and lower temperatures but not below freezing. Rainfall averages about 2 to 4 cm per day on most tepuis. Where there is anything that can be called "soil", there is generally sand, rocks, and decomposed plant matter. Stewart McPherson typifies the habitat as a rain desert. Large parts of the tepuis are devoid of vegetation and even where there are locations that appear perfect for Heliamphora, the plants are very patchy.
It can be impossible to provide the exact conditions many plants experience in the wild. In most cases it does not matter. The trick is to find out among the set of conditions you can provide which ones are necessary and sufficient to grow the plants well. If you cannot or it is not convenient to provide those conditions, grow something else you can grow well. Fortunately Heliamphora plants are pretty tough, preadapted to cool human house temperatures, and grow well under artificial lighting. It is going to take time to learn how to best grow these plants. The easiest Heliamphora to grow are hybrids and the generic or typical selections of Heliamphora heterodoxa, Heliamphora nutans, and Heliamphora minor. Beginners should start with these plants.
As is the case for most plants, taking care of the roots is what is most important for growing Heliamphora. Jaffe et al. report that the root temperatures of the plants they studies in the wild were in the range of 16 to 20°C (60 to 68°F) while the air temperatures went through wider swings. Andreas Wistuba has reported that in captivity the plants will tolerate temperatures up to 30°C (86°F) while temperatures above 40°C (104°F) are fatal for most species. Large plants are especially susceptible to heat and can die with prolonged temperatures above 26°C (79°F). On the low temperature side the plants will survive light frosts. It is not necessary to cool the plants at night as long as the soil temperatures were not elevated during the day.
Andreas Fleischmann reported experiments with a common pathogenic fungus that can be found in Heliamphora plants in the wild and in captivity. The fungus grows in the plant vascular system. He showed that infected plants can die in less than 10 days if kept at a constant temperature of 28°C (82°F) and high humidity. It is unclear whether at that temperature the fungus simply gets out of control clogging the vessels or whether the vessels become damaged encouraging the fungus to grow excessively. The plants can become infected from soil, rainwater, and other plants. Reusing soil, using contaminated soil ingredients, and overhead watering can spread the fungus.
Heliamphora in the wild can be found growing partially submerged in water or at least flooded by daily showers. This stream of fresh rain water flows through their environment limiting bacteria and fungi as well as providing oxygen to the roots. Although this is what happens in the wild, it is not necessary to flood or top water the plants daily. What is important is growing the plants with enough light, in an appropriate soil mix matching the watering schedule, with a fertilization technique that matches the growing environment.
Heliamphora can be grown very well in a cool, humid greenhouse but they do require very bright light. The problem with greenhouses can be sufficient cooling in summer and heating in winter to keep the plants in their preferred temperature range with enough light. Plants grown in a greenhouse usually do best in a light soil mix with daily watering. If the plants are overhead watered every day they will need either a small amount of fertilizer in the water or a slow release fertilizer in the soil. If the plants are watered via emitters then foliar feeding is adequate. Plants on emitters usually need a slightly heavier soil mix to evenly distribute the water.
The easiest way to grow Heliamphora is indoors under artificial lighting. Unless the humidity in the basement or room with the plants is higher than 70%, the plants will need to be in an enclosure such as a terrarium. If the enclosure has reflective sides, the plants will require at least 20 watts of LED lighting or 1200 lumens per square foot (30 cm2) for 15 hours a day at a distance of about 10 to 15 cm (4 to 6 in) above the plants. If the enclosure does not have reflective sides or the lights are on a shorter period each day, the plants will need more intense light. Remember that light only from the top will not be very effective because the pitchers need light from the side as well as the top.
Fluorescent lighting is not recommended unless there is a way to keep the heat they generate away from the plants. If fluorescent lighting must be used, small fans can be used to get rid of the heat and/or a piece of Plexiglas between the lights and the plants to help insulate them from the heat. Hydroponic or indoor plant stores tend to stock better lighting and cooling supplies than home stores.
Watering in a terrarium can be problematic. I use a soil mix that allows me to keep the plants sitting in a few mm of water all the time. Other growers water their plants daily or every other day draining off the excess. Some growers keep them even drier under the assumption that drier soil will help reduce problems with fungus. Always use pure water (reverse osmosis is most common) or at least tap water that is very low in dissolved minerals. Generally well water is too salty. Filtering or softening will not make the water less salty.
The soil ingredients and the ratios used depend on what you can get, the quality of the material available, and how you want to handle watering. It is also important to consider what will happen with the plants during vacations. Plants top watered or flood watered every day require a different soil mix from plants watered less often or that sit in a few mm of water all the time. For the exact ratios of materials it is best to let the soil and the plants tell you whether what you are using is working or not. The soil should never dry out, the plants should root well in it with roots throughout the soil and the soil should never be stinky from the organic ingredients rotting. This means you need a combination of ingredients that allow the soil to hold a lot of water yet have air spaces to keep the soil aerobic.
The current consensus among North American growers is the best long term potting medium for Heliamphora is the one recommended by Butch Tincher: equal parts long fibered Sphagnum, perlite, and aquatic planting medium (or aquatic plant soil). This is based on materials that are available in North America. Aquatic planting medium is a speciality product. It may be difficult to find in some areas. Check with stores specializing in ponds and pond plants. It contains the clay products arcillite(W) and zeolite(W) which hold moisture and nutrients but do not break down. Alternate soil mixes are just long fibered Sphagnum and perlite, long fibered Sphagnum and coarse sand, or the mix I use of equal parts long fibered Sphagnum, coarse sand, and aquatic planting medium.
In Europe Andreas Wistuba recommends a soil mix of equal parts fine horticultural pine bark, long fibered Sphagnum, and Aggrofoam™. Aggrofoam™ is plastic product produced in Germany that serves the same function as perlite only much better. I have found orchid bark available in the USA to be quite variable in quality and sometimes can be toxic, I presume from too much added fertilizer. The fertilizer in orchid bark is probably the reason it has been a popular potting ingredient for Heliamphora. The plants can do great in orchid bark at first. As a potting medium orchid bark breaks down quickly. It is not uncommon to grow Heliamphora two or more years without repotting and it is best to use soil ingredients that last that long. If you can get good quality orchid bark and it holds up under your conditions, then use it. There is no magic mix, you have to find one that matches what you can get and and the growing conditions you can provide.
Many growers use a mulch of live Sphagnum moss on the soil surface. The plants like this very much but the Sphagnum tends to overgrow small plants. I use a 1 cm thick mulch of sand to minimize moss and fungus gnats. The plants do not like it as well but I am also not breaking off pitchers keeping the Sphagnum under control.
Heliamphora requires fertilization to grow well. With the recommended neutral, minimal-organic soil mixtures something has to be done to help the plants grow. The plants can be sprayed with a fertilizer solution, a fertilizer solution or fertilizer pellets can be put into the pitchers, the plants can be watered with a fertilizer solution, and fertilizer pellets can be added to the soil. I find it is best to use fertilizers with a high ratio of nitrogen to other nutrients but low in or with no urea nitrogen. Urea is not directly usable by plants and needs to be broken down by bacteria to be effective. Nitrate-based fertilizers make all the nutrients immediately available, so care needs to be taken not to use too much at one time.
Heliamphora, like Sarracenia, is quite capable of utilizing nutrients in the soil although Heliamphora can not tolerate the fertilizer levels that Sarracenia appreciates. Commercial carnivore growers put very small amounts of fertilizer in their water—on the order of 1/2 tsp fertilizer per 10 gallons (1 g per 40 l) of water. This will raise the TDS (total dissolved solids) in the water by 25 parts per million. One of the easiest ways to kill a Heliamphora plant is to put too much fertilizer in the soil. Some species are more sensitive to soil fertilization than others so be VERY careful if you go this route.
For plants that have adult pitchers, in-the-pitcher feeding is the best option. A solution of 1/2 tsp per gallon (1 cc per 2 l) of a 20-14-13, urea free water soluble orchid fertilizer or a 16-16-16 fertilizer containing some kelp extract in pure water about once a month are recommended by a number of growers. I find it more convenient to use one or two 19-6-12 Osmocote™ fertilizer pellets per pitcher. Of course you have to add water to the pitchers if you use fertilizer pellets and check the pitchers occasionally to make sure they still have water in them. Do not overfill the pitchers so that in-the-pitcher feeding becomes soil fertilization. Keep in mind that 1/2 tsp per gallon of water will raise the TDS by 350 parts per million. That plus any salts in the water to start with is much too strong for Heliamphora soil fertilization. If you want to be safe, dilute the 350 ppm stock solution with 4 parts water to get 70 ppm. Generally 70 ppm is safe in the soil if you top water your plants well a few times between fertilizations.
Butch Tincher recommends the use of the fungus Trichoderma in the soil. There have been scientific experiments published showing that Trichoderma species can increase root growth, help certain plants under stressful conditions, and protect plants from pathogenic fungi. There are many products on the market containing Trichoderma targeted at indoor farmers of a crop that is legal only in a few states. These products may or may not help keep Heliamphora roots and plants healthy. There are no generally accepted guidelines for Trichoderma products or their use.
The only way to have a plant a long time is to grow it and propagate it. Plants need to grow to remain healthy. Healthy mature Heliamphora naturally divide, especially when they bloom. In addition TC plants divide excessively until they get the hormones out of their system.
Dividing mature Heliamphora is where you see how well your soil mix and growing conditions are working. Division time is also a dangerous time for plants. The larger the plant the more care needs to be taken. The best time to rip the plants apart is when they are at their peak and temperatures are relatively low. Avoid dividing plants in the late spring and summer if your plants get above 26°C (79°F) in summer. You may wish to foliar feed the plants the week previous to dividing and water well the day before.
- Carefully inspect the plant before you start finding the growth points and deciding which of the old leaves you intend to remove. Unexpected things always happen but it is best to have a plan before you start.
- Carefully unpot the plant on its side. Brush away surface soil and any moss. I try to disturb the roots as little as possible by maintaining as much of the soil as I can in the root ball or at least on the roots.
- See if the rhizome of the plant wiggles at any point between growth points. If so snap or cut it at that point. If the rhizome is tight, use pruning scissors to cut the rhizome in the older part back from the growth points.
- Carefully pull apart the divisions. It may work out that each division is done one at a time and steps 3 and 4 are repeated multiple times.
- Clean up the division. Remove old leaves. Trim back broken leaves—you will break leaves. Maybe trim the rhizome. There might be some small, rootless divisions you could take at this point for give-away plants after they become established. Treat them like leaf pullings.
- Pot up the divisions in your regular Heliamphora soil mix. Pay attention to where the growth points are and arrange the plant in the pot so they have as much space as possible in front of the growth points. While adding the soil it is very important you do not leave air spaces under the plant. Do not pack the soil with your fingers. Add a little soil at a time and tap the bottom of the pot on your potting bench to settle the soil. Add some more soil, repeat.
- After you think you have enough soil in the pot, flood the pot a few times with water to help settle the soil and add more if necessary. The water should run through the pot quickly.
- Inspect the plant to make sure it is at the right soil height and placed well in the pot. Make sure the plant has a name tag.
- Put pure water or very dilute fertilizer water (70 ppm) in the pitchers if the plant has adult pitchers. Optionally you can treat the soil with Trichoderma. If you normally soil fertilize, do not soil fertilize the plant until it is fully recovered and growing again.
- If your terrarium humidity is below 85%, bag the plant. Make sure the bag is not too close to the lights or in the sun if you use natural light. High temperatures in the bag will kill the plant. Keep the plant bagged about a month or until it starts growing normally.
When dividing Heliamphora I like to remove the excess leaves and the younger and smaller of those leaves can be used for leaf pullings. For some species the success rate is high, for other species it is quite low, but it is worth a try. Heliamphora leaf pullings work best with juvenile leaves and small pitchers. I have never been successful with large pitchers even if the tops are trimmed. Pull the leaves down making sure you get the whole base of the leaf. You can put the leaf in regular Heliamphora soil mix or 100% live Sphagnum or live Sphagnum over the soil mix. The pot with the leaf pullings should be sealed in a plastic bag and placed under artificial lighting taking care to keep the pullings cool. Do not be discouraged if the leaf tips die back. What matters is what is under the soil or Sphagnum. It can take 6 months to a year for the pullings to root and grow.
It is possible to pollinate Heliamphora flowers and get seeds. Please see the Don Schnell CPN article on pollinating flowers ( PDF ). Plants from seeds grow very slowly unless they are started in sterile culture (or "TC"). If the seeds were produced by selfing a clone it is likely the plants from seeds will not be as vigorous as the currently available selected TC clones.
-- John Brittnacher
March 2013
For more information please see:
McPherson, S., Wistuba, A., Fleischmann, A., and Nerz, J. (2011) Sarraceniaceae of South America. Redfern Natural History Productions Ltd., Poole.
Jaffe, Klaus, Fabian Michelangeli, Jorge M. Gonzalez, Beatriz Miras and Marie Christine Ruiz. (1992). Carnivory in Pitcher Plants of the Genus Heliamphora (Sarraceniaceae). New Phytologist 122(4):733-744. ( PDF )
Ziemer, Robert R. (1979) Some Personal Observations on Cultivating the Heliamphora. Carniv. Pl. Newslett. 8(3):90-92 ( PDF )
Dodd, Cliff and Powell, Charles L. (1988) A Practical Method for Cultivation of Heliamphora spp.. Carniv. Pl. Newslett. 17(2):48-50 ( PDF )
Butschi, Lorenz. Translation by Dorothea Huber and Klaus Ammann (1989) Carnivorous plants of Auyantepui in Venezuela. Part 2. Carniv. Pl. Newslett. 18(2):47-51 ( PDF )
Wistuba, Andreas (1990) Growing Heliamphora from the Venezuelan tepui. Carniv. Pl. Newslett. 19(1-2):44-45 ( PDF )
Baumgartl, William (1993) The Genus Heliamphora. Carniv. Pl. Newslett. 22(4):86-92 ( PDF )
Schnell, Don (1995) Pollination of Heliamphoras. Carniv. Pl. Newslett. 24(1):23-24 ( PDF )
Schnell, Don (1995) Heliamphora: The nature of its nurture. Carniv. Pl. Newslett. 24(2):40-42 ( PDF )
Rivadavia, Fernando (1999) Neblina expedition. Carniv. Pl. Newslett. 28(4):122-124 ( PDF )
Nerz, Joachim and Andreas Wistuba (2000) Heliamphora hispida (Sarraceniaceae), a new species from Cerro Neblina, Brazil-Venezuela. Carniv. Pl. Newslett. 29(2):37-41 ( PDF )
Wistuba, Andreas and Peter Harbarth and Thomas Carow (2001) Heliamphora folliculata, a new species of Heliamphora (Sarraceniaceae) from the 'Los Testigos' table mountains in the South of Venezuela. Carniv. Pl. Newslett. 30(4):120-125 ( PDF )
Wistuba, Andreas and Thomas Carow and Peter Harbarth (2002) Heliamphora chimantensis, A new species of Heliamphora (Sarraceniaceae) from the 'Macizo de Chimanta' in the South of Venezuela. Carniv. Pl. Newslett. 31(3):78-82 ( PDF )
Nerz, Joachim (2004) Heliamphora elongata (Sarraceniaceae), a new species from Ilu Tepui. Carniv. Pl. Newslett. 33(4):111-116 ( PDF )
Carow, Thomas and Andreas Wistuba and Peter Harbarth (2005) Heliamphora sarracenioides, a New Species of Heliamphora (Sarraceniaceae) From Venezuela. Carniv. Pl. Newslett. 34(1):4-6 ( PDF )
Nerz, Joachim and Andreas Wistuba (2006) Heliamphora exappendiculata, a clearly distinct species with unique characteristics. Carniv. Pl. Newslett. 35(2):43-48 ( PDF )
Barnes, Brian (2010) Growing Heliamphora indoors year-round. Carniv. Pl. Newslett. 39(1):26-27. ( PDF )
Tincher, Butch (2013) My techniques for the indoor cultivation of Heliamphora. Carniv. Pl. Newslett. 42(4):137-144. ( PDF )
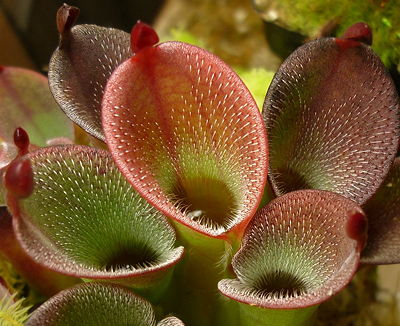
Heliamphora pulchella, Akopán Tepui. Photo by RL7836.
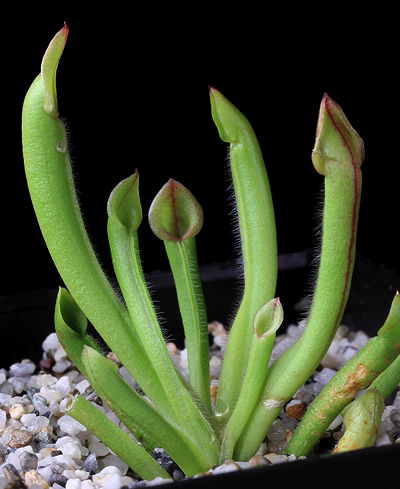
Juvenile Heliamphora minor.
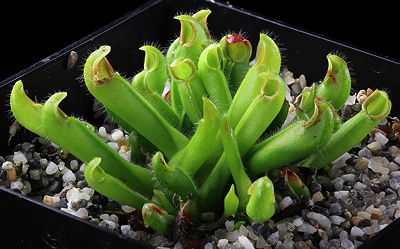
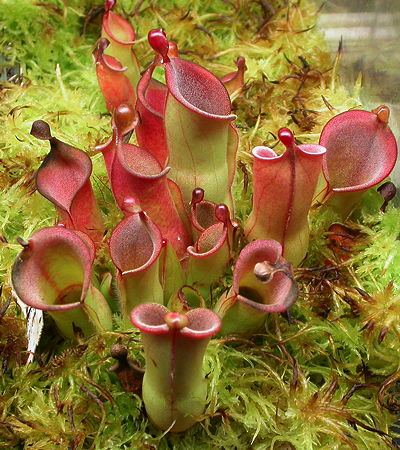
Clump of juvenile Heliamphora pulchella. It is typical for the hormones used in sterile culture to cause the plants to form clumps. This species also tends to be clumpier than most.
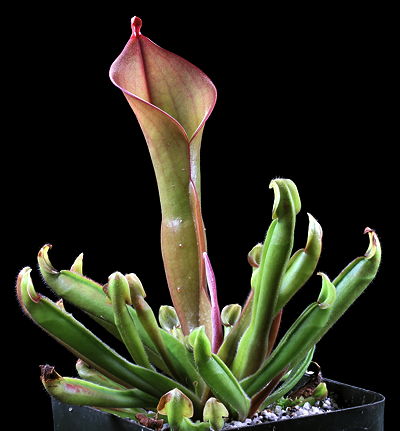
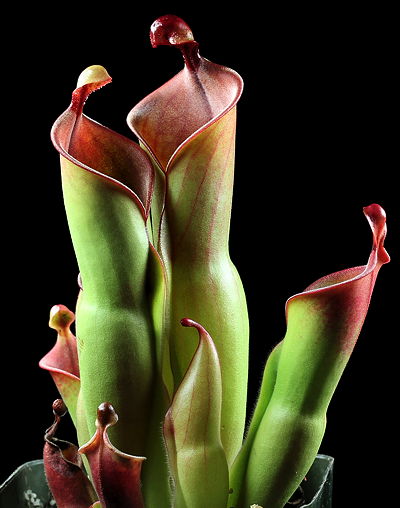
First adult pitcher for a Heliamphora nutans plant. This plant has multiple growth points typical of TC plants.
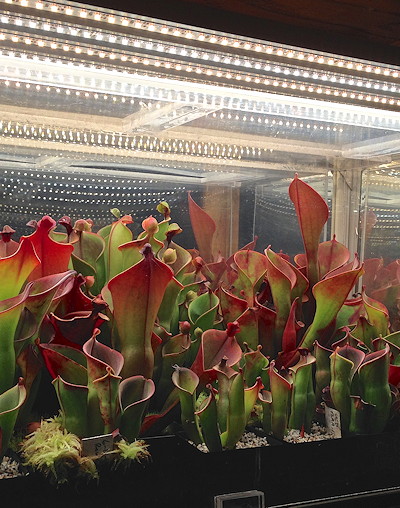
Heliamphora under LED light strips.
Heliamphora heterodoxa x ionasi hybrid. This plant was grown under 54W 3000K T5-HO fluorescent lights which generally result in somewhat shorter and redder plants than those grown under 6500K lighting.
Sphagnum moss overgrowing Heliamphora heterodoxa x nutans.
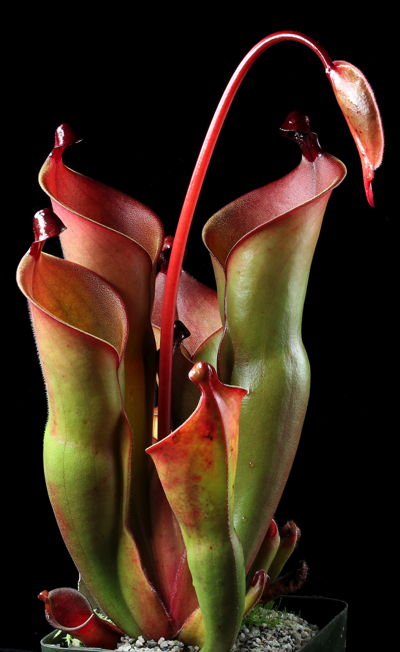
Heliamphora heterodoxa x nutans hybrid.
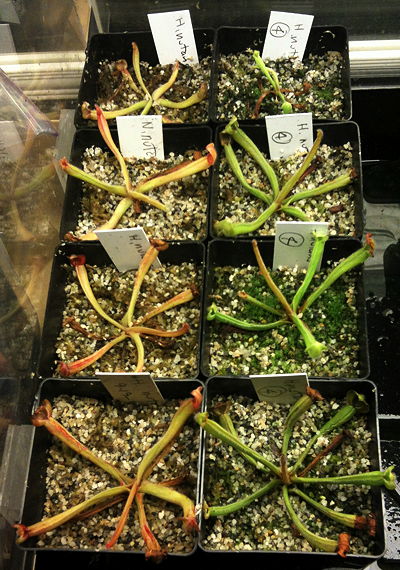
Results of a fertilizer experiment with Heliamphora nutans. The plants on the right each got four 19-6-12 Osmocote™ pellets. The plants on the left are the controls without fertilizer. The experiment was set up so there was a bias to larger control plants. The plants were grown next to each other. The soil is 1:1 sand:LF Sphagnum. The plants constantly sat in a few mm of water. I had to stop the experiment at this point because of terrarium space issues. NOTE: This amount of fertilizer can be too much for some Heliamphora plants.
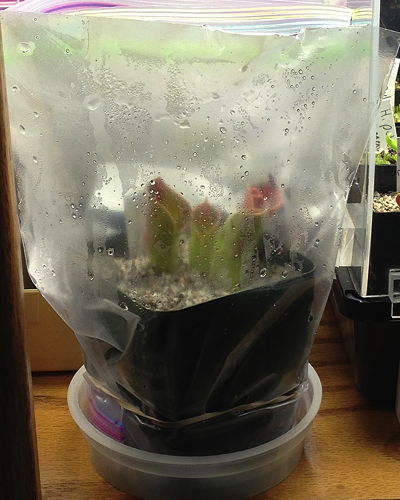
Plants that have been divided or received bare-root should be bagged for about a month until they start growing. If the plants had just taken an intercontinental journey consider soaking them overnight in water.
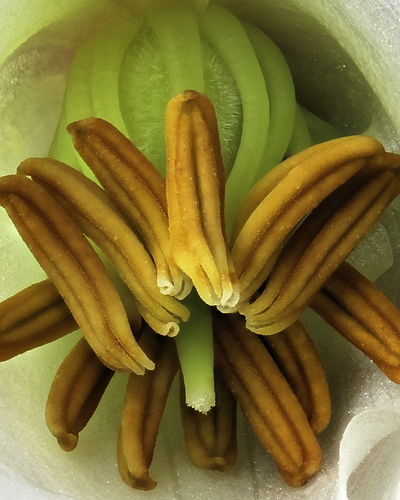
Heliamphora nutans flower parts. The anthers fold around the pollen-producing cells forming a tube. The pores at the bottom of the anther are where the pollen is released when the anther is buzzed by a bee. Poricidal anthers protect the pollen from rain.