
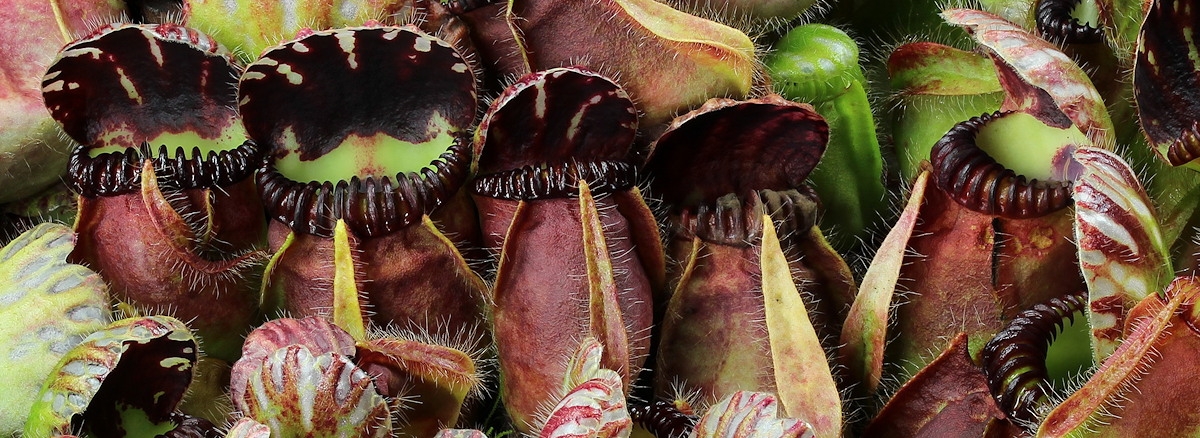
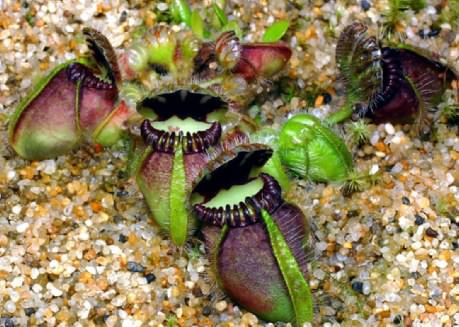
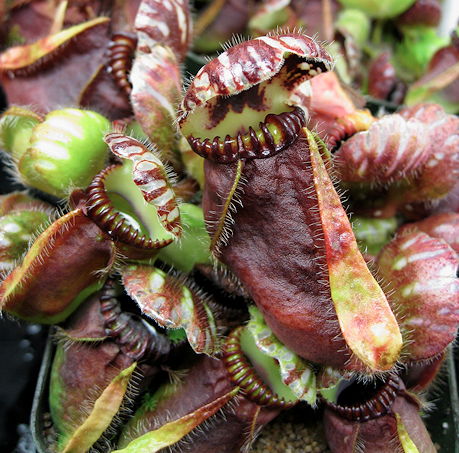
Cephalotus follicularis is a popular plant among collectors for many reasons. Its small size and intricate pitchers make it a great addition to any terrarium or sunny windowsill. Evolutionarily, Cephalotus is placed in a separate family and thus has no close connections with other carnivorous plant taxa. Its remote placement makes it desirable for institutions and people trying to collect representative members of the diverse carnivorous plants.
Cephalotus can be a tricky plant to cultivate, but the problems are easily solved if the plant is given a little special attention. The main cause of “sudden Cephalotus death syndrome” (which is rapid plant collapse) appears to be root rot. The reason for suspecting the roots is because when the crowns of Cephalotus die, the plant recovers from the roots or stem.
Unlike many other carnivorous plants, Cephalotus does not like to be grown in trays of deep water as is done with other genera such as Sarracenia, Utricularia and many Drosera. The continually wet conditions appear to make the plant prone to rot. Unfortunately, Cephalotus does not show any outward symptoms of rot or distress until it is too late and then the plant collapses quickly.
However Cephalotus can be easily grown in tall pots sitting in a small amount of water without overhead watering. The trick is to use a soil mix appropriate for your growing conditions. It may take some experiments and you may lose some plants in the process. A healthy, well adjusted Cephalotus will maintain water in its pitchers. Increase the organic matter in the soil if the pitchers are dry. If plants die, decrease the organic matter and use a "mulch" of pure, coarse sand.
Growers of Cephalotus all have their favorite soil recipe for the plants so there is no real consensus about what the “ideal” soil mixture should be. We have found that 75% sand / 25% peat or sphagnum appears to work well for our plants at the Conservatory. This mix is rather porous and readily drains water, thus reducing the chance of root rot. Other mixes that contained either pumice or perlite were also acceptable. I also personally like to add a layer (¼ to ½ an inch) of pure sand on the top of the soil. This keeps the crown of the plant a little dryer and helps retard the growth of moss.
Cephalotus grow best and are the most colorful with a lot of light. South facing windowsills are the best for them, but east and west will sometimes work. The plants grow well in both greenhouses and in terrariums. They can even survive outdoors in the intense summer sun and heat of Davis, although the plants were considerably smaller than the ones grown in the greenhouses. The plants also can withstand light frosts with no damage.
Propagation of Cephalotus
Cephalotus can be propagated by several means, namely seed, leaf / pitcher cuttings, crown divisions and root cuttings. Unfortunately, all of these approaches are rather slow to produce large plants, although the crown and leaf cuttings are certainly faster than by seed.
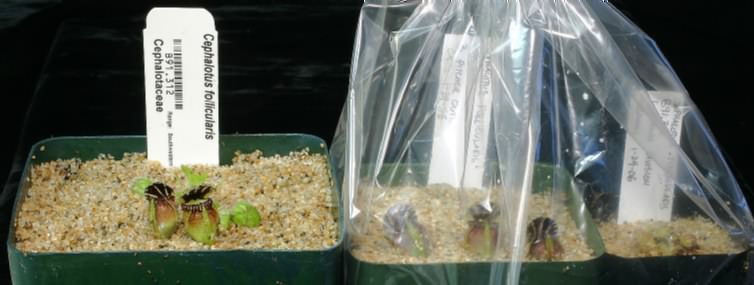
The first approach is by seed. This is difficult in two aspects. First, Cephalotus seed is hard to obtain, although it sometimes shows up in the ICPS Seed Bank. Even when it does show up, it is often on the “seed donor only” list (i.e. people that have donated enough seed to have a seed credit with the bank). The second problem with propagation by seed is that it is a very SLOW method; you will need a lot of patience! Once you get your Cephalotus seed, you should plant it immediately. Finely chopped sphagnum moss works well as a seed germination substrate. Place the seeds on the surface of the substrate and do not bury them. Water the seeds well and then put the pot into a sealed plastic bag and cold stratify the seeds for 8 weeks in the refrigerator. Once the stratification is over, remove the pot from the refrigerator and put it in an area with bright, diffuse light but no direct sun in a greenhouse or under fluorescent lights. Leave the pot in the plastic bag. With a little luck, germination should occur after several weeks and although it can take months to a year. The plants are very small to start, so I leave the pot in the bag for a long time while the plantlets grow. Since the plants are tiny, they are easily overgrown by moss, so keep an eye on the moss and make sure it does not overgrow the Cephalotus seedlings—it is not unusual to transplant them to new media several times. When the plants are big enough to safely transplant, then start to open the plastic bag a little at a time over the course of a few days to let the plantlets adjust to the new lower humidity levels. After transplanting the Cephalotus seedlings, the plants should be kept in a propagation terrarium or other place with high humidity until the get large enough (~2.5 cm across) to transition to their final growing place. As soon as the pitchers are large enough to gag down a dried bloodworm you can start feeding them that way. When the plants have mature pitchers they can be fed with high nitrogen Osmocote® Outdoor & Indoor Smart-Release® Plant Food pellets but do not get carried away with the pellets. Usually one pellet per plant every few months is more than adequate. Do not feed the plants in the pitchers unless the plants are able to maintain water in the pitchers on their own. You can expect to get a mature plant in 3 to 5 years depending on conditions.
A quick little experiment was conducted with fresh seed. There were three treatments: no stratification, 4 week stratification and 8 week stratification. The seeds (18 per treatment) were planted in April and they were germinated on sphagnum moss in 3" square pots. After the stratification time, the pots were moved to a greenhouse and put in partly shady conditions. After 5 months, only 4 seeds germinated and they were all in the "8 week stratification" treatment. However, by November (7 months after start of experiment), considerably more seeds germinated. The results from the no stratification, 4 week stratification and 8 week stratification were 8, 4 and 9 seedlings (per 18 seeds planted) in each treatment. Most of the germinations occurred during the fall time, so the time of year may be more important than the stratification time. However, the results confirm the notion that stratification is either beneficial or has no effect. Also, the seedlings that germinated earlier were the largest seedlings at the end of the experiment, thus it is beneficial to get the seedlings going as fast as possible.
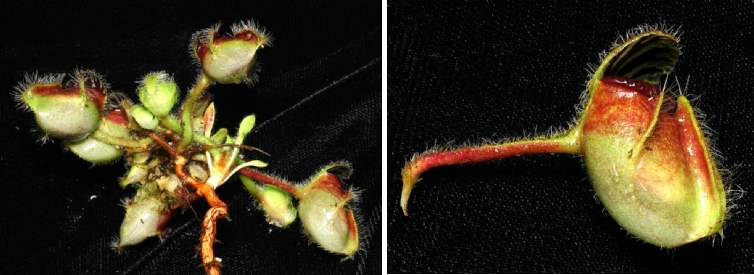
Pitcher cutting. Notice a piece of the stem. This can be rough on your plants.
Leaf / pitcher cuttings and a crown division in pots in plastic bags.
The second approach for propagating Cephalotus is leaf/pitcher cuttings. Both leaves and pitchers can be used, although I personally use pitchers more often since many of our clones produce small leaves. The approach is the same with both leaves and pitchers. Select and remove newly-developed leaves or pitchers from the plant. Older leaves do not seem to take as well. Remove the leaf where the petiole adjoins the crown of the plant by tugging the leaf downwards. Tweezers or forceps are useful in delicately removing the leaves. Alternatively, the parent plant can be un-potted and then the leaves removed. The new plantlets will form at the base of the petiole, so it is important to get the base of the petiole intact. The presence of some stem tissue may help in the formation of the plantlet. Once the leaves/pitchers are removed, then lay them face-up on a 50:50 mix of peat:sand and bury the petiole such that it is just below the soil surface. Do not cover the leave blade or pitcher to any extent. Water the leaf cuttings well and place the pot in a sealed plastic bag. The pot should be moved to a location with bright, indirect light. Leaf/pitcher cutting can form plantlets in as little as one month or as long as 9 months, so be prepared to wait for a while. The pitcher cuttings will often close as a result of water stress, so don’t be surprised if this occurs. So long as the leaf/pitcher remains green, then there is a chance that the cutting will take. Once the plantlet is formed, it will develop fairly rapidly and can be transitioned out of the bag soon after emerging. I have found that pitcher cuttings are a very reliable method for Cephalotus propagation with a success rate of 75-90%. This is the dominant propagation method we use at the Botanical Conservatory.
The third propagation approach is division or crown cuttings. Cephalotus often develop multiple growing points that are connected to the root system. Ideally, each crown should have its own roots when it is removed (i.e. a division). However, the crowns often do not have their own roots, so you cut through the rhizome and obtain a crown with pitchers but no roots. Always leave the largest 1 to 2 crowns on the parent plant. Even small crowns can be removed and rooted. Once a crown has been removed, then it is planted in a 50:50 peat:sand mix and watered well. The cuttings are then put in a sealed plastic bag and treated like leaf cuttings. Most crowns will have formed enough roots after 2-3 months that they can be removed from the plastic bag to a high-humidity terrarium. This approach has a couple advantages. The first advantage is that the success rate for crown cuttings is very high (90-100%). The second advantage is that some Cephalotus develop many small crowns that crowd each other. This helps to thin-out the plant so the remaining crowns can grow larger and make larger pitcher. Lastly, this is a vegetative method that is useful for generating popular clones such as the “giant” form of Cephalotus.
-- Tom Cahill with John Brittnacher
December 2011
For more information please see:
Evolution -- the Oxalidales Carnivore
Tran, Dick (2001) Cephalotus cultivation: cultivation with capillary mats. Carniv. Pl. Newslett. 30(3):88-89 ( PDF )
Mann, Phill (2005) Observations on Cephalotus follicularis and Drosera binata in Western Australia. Carniv. Pl. Newslett. 34(3):68-70 ( PDF )
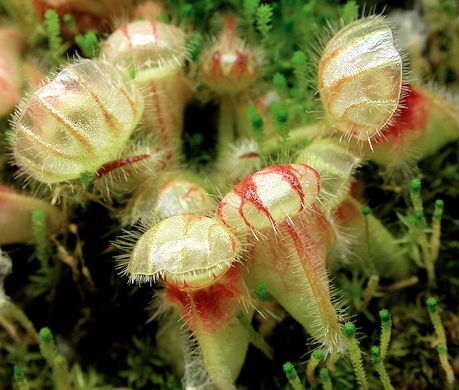
Cephalotus seedling. At this stage you can feed the plants by putting dried bloodworms into the pitchers.
This Cephalotus plant is mature enough to appreciate ONE Osmocote® Outdoor & Indoor Smart-Release® Plant Food pellet in a pitcher. Note the pure sand "mulch".
These plants are grown under lights. They do not get fed very often to keep them from getting too big. In a terrarium in tall pots the plants can sit in 5 mm of water. Make sure the soil mix is about 75% sand and the top 1 cm is pure sand.