Vegetative propagation of Nepenthes comes in two main forms: tissue culture and stem cuttings. While the large-scale Nepenthes nurseries use tissue culture to generate huge numbers of plants, this is not a common technique for the average hobbyist due to the difficulty associated with this method. Also, most hobbyists do not need to generate hundreds of the same plant.
The far more common method of Nepenthes propagation for the hobbyist or small scale nursery is stem cuttings. The exact details of the procedure vary considerably between different growers, so the following are guidelines that can be easily modified.
When to take cuttings: Nepenthes cuttings can be taken at any time of the year, but the cuttings taken when the parent plant is actively growing seem to take faster and have greater success rate. This probably has more to due with the health and vigor of parent plant than the actual cutting time. If the parent plant is growing well, chances are the cuttings will do well under the same conditions. If the parent plant is not doing well, the temperature could be too hot or cold and the cuttings may not root well under those conditions.
What material to take for cuttings: The ideal Nepenthes propagation situation is a plant that has a tall climbing stem with widely-separated leaves and a new basal rosette of leaves. In this case, the climbing stem (either the whole stem or just the tip) can be taken as cutting material leaving the parent plant with an intact basal rosette. If you only want to generate a single new plant, then the active growing tip of the stem with about 2 to 3 leaves is the absolute best cutting material. The stem on the parent plant will generally re-sprout near the tip assuming there are still green leaves on that stem. It will take the parent plant a few months to re-sprout and look presentable again. If you want to generate a large number of plants, then clip the entire climbing stem so the plant has just a basal rosette.
If the plant lacks a basal rosette there are two options. The cuttings can be taken immediately but do leave at least 4 green leaves on the stem. If it is a long stem it may be better to encourage the plant to grow a new basal rosette. You do this by laying the pot on the side and letting the long stem go out horizontally or, even better, hang down. In a few months the plant should sprout a new basal rosette an you can remove the whole climbing stem.
If you are trying to propagate a species that likes to remain as basal rosettes, then the propagation is still possible but it is much more delicate operation (see section below).
For rooting medium you need to use a loose neutral to slightly acidic medium with little or no nutrients that drains well. Experienced growers use long-fiber Sphagnum moss or 50:50 mix of long-fiber Sphagnum moss and perlite or 50:50 mix of coir and perlite. If you use coir, make sure the product package says something like "exposed to rain water from at least three monsoon seasons" to assure the salts are leached out. If you buy dried long-fibered Sphagnum moss make sure it really is Sphagnum moss. Sheet moss commonly used to line hanging baskets is NOT Sphagnum no matter what the package says.
The medium must be damp, but not sopping wet or sitting in water.
Once the climbing stem has been removed, then you need to decide how to cut it up to get the most of it. The Nepenthes cutting will only grow a new stalk from a growth bud that is just above a leaf axis, so all cuttings must include a leaf node or a growing tip. The roots will form at the location of the cut on the bottom of the cutting. The roots do not form (at least initially) at the leaf nodes.
To make the cuts it is best to use a brand new single-edged razor blade and to do the cuts under water. A new blade is sharper and does not crush the stem as it is cut. It is also cleaner. If you are doing a lot of plants you might want to change blades often. Cutting under water helps keep air from blocking the ability of the stem veins to absorb water at the cut.
The stem can be cut into 1, 2 or 3 node cuttings; all of which have their advantages. Typically make 1-node cuttings from the stem segments near the growing tip and make 2-node or 3-node cuttings from segments that are low on the stem and are not as vigorous. (see figure)
One-node cuttings seem to be a little less reliable, but you can get the most plants out of a batch of cuttings. One-node cuttings are best reserved for easy-to-propagate species and/or very recently grown material just below the growing tip. For short one-node cuttings, lay the stem horizontally in the rooting media and have the leaf pointing upward. Bury the stem in about 3 to 5 cm of the rooting media. The new growth will start at the growth bud under the soil surface and grow up through the soil. Longer cuttings can be placed in the media with the stem vertically like two-node cuttings.
Two-node cuttings are sections of stems with two green leaves and growth buds. Cut off the lower leaf and stick the stem vertically in a pot with the lower node under the soil level and the upper node and leaf about the soil level. These tend to be a little more successful than one-node cuttings.
Three-node cuttings are the same as two-node cuttings except that 2 leaves can remain on the cutting—remove the bottom leaf. The stem is planted vertically with the two leaves above the ground and one below the ground. Two and three node cuttings are best for the older sections of the stem that are not quite as robust as the recent sections.
One important point if you really care about long term maintenance of your new plants, is to make sure that the cutting has one growth bud below the soil level. This provides a location for the plant to re-sprout in the future if the top of the plant is broken off or otherwise damaged. It also provides a location to form a new basal rosette. I have seen cuttings where the only growth bud was about 5 cm about the soil, so the plant formed basal rosettes in the air. Not only did this plant look funny, but it was also vulnerable to having the top broken off, thus killing the plant.
Some growers suggest cutting the leaves in half, thus leaving only the half of the leaf nearest the stem. The reason for cutting the leaf in half is to reduce transpiration from the leaf and thus reducing the chance that the cutting will dry out. However, if the cuttings are sealed in a plastic bag that ensures a very high humidity, then this is not necessary. Pitchers can also be left on if desired, but they typically make the cuttings hard to fit in a bag (particularly if there are many cuttings in a single pot) so I typically remove them.
Some growers split the stem up about 10 mm from cut end. Do it under water and in such a way as the blade is NEVER pointed toward any of your body parts you want to keep. After the stem is split, shove a small piece of Sphagnum moss up the slit to hold the two sides somewhat apart.
Some growers use rooting hormone on the cut edges. In our experience using hormone is not helpful and too strong a hormone concentration can actually keep the cuttings from forming roots. If the cutting forms a callus but no roots then the hormone is too strong. If you still want to use a hormone, you should never dip the cutting into the jar of hormone as this would contaminate it. Pour out a small amount on a piece of paper and touch the cut edge to hormone on the paper or use a small brush to apply a small amount. If you use a liquid hormone use the amount recommended for soft wood cuttings at the recommended time in the solution.
Post cutting treatment: The cuttings should be labeled (including the date at which the cutting was taken) and sealed in a plastic bag. The plastic bag will ensure that the cuttings will not dry out. The bag should then be placed in a brightly-lit area but out of direct sun.
The next part of the process is the hardest: waiting for the cuttings to take. Depending on the vigor of the parent plant, the species and the exact rooting conditions, this can take between a month to a year. Some species simply take a LONG time to root; so long as the leaves are still green, then there is still a chance it will take. Wait until there are new signs of growth before pulling the cuttings out of the bag and repotting them. Pull any failed cuttings out of the bag when you notice them so they do not serve as points for rot. Once the plants have rooted and started to grow, then pot them up in the growing pot and put them in a terrarium (or partially opened plastic bag) to transition the cuttings to the lower humidity conditions outside.
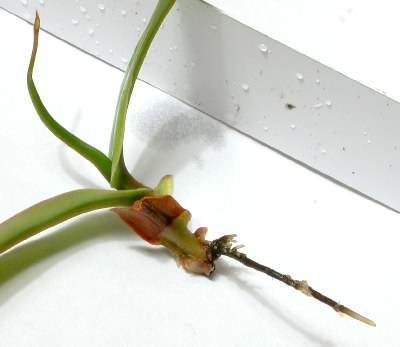
Nepenthes bellii terminal stem cutting showing a new root at the base of the stem.
Cuttings from basal rosettes: Some species of Nepenthes do not like to grow tall climbing stalks on a regular basis. This presents a real problem for propagation since 1) the active growing shoot and all the green leaves are crammed together in about 2.5 cm of stem (or less!); 2) the plants will often only have one rosette so you risk losing the parent plant; and 3) you can only get one tip cutting per attempt.
The goal of this procedure is to get the growth tip with one or two leaves on it that you can use for a good cutting and leave about 4 good leaves on the parent plant. The trick is that the leaf petiole extends down the stem a little an overlaps with other petioles, so it is hard to ascertain where the actual growth tip is (and not just overlapping leaf material). I tend to cut the stem in the basal rosette below the 4th leaf from the tip with a razor blade or scalpel. It is important to get a clean cut since there is so little space along the stem and you cannot afford to damage any more of the stem than necessary. Often the 4th and 3rd leafs will peal off since they were actually attached to the stem below the cut. With luck, you should have one or two leaves on your cutting.
The cutting is dipped in rooting hormone (which is generally not needed for the Nepenthes cuttings) and potted in a pot in the same mix as other Nepenthes. The challenge here is that your stem cutting is probably only 1 cm long with a leaf sticking out the side, so it is hard to bury and keep in the right place. I suggest that you use a length of wire bent into a U-shape to hold the cutting down in the desired place and then bury the stem in about 0.5 to 1 cm in Sphagnum moss. Place it in a plastic bag and treat it like other Nepenthes cuttings. I have had good luck with this procedure, but it is hard on the parent plant and often sets the parent plant back half a year to a year.
-- Thomas Cahill with John Brittnacher
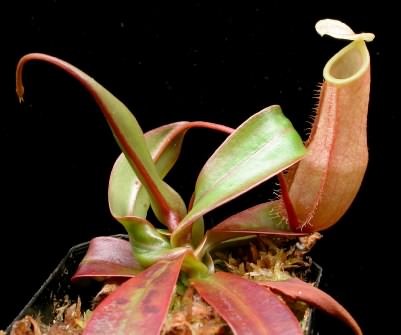
Nepenthes bellii 18 months after being propagated by a stem tip cutting.
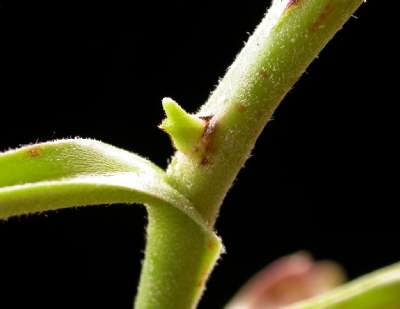
The growth buds on Nepenthes are a few mm above where the leaf attaches to the stem. Make sure you cut the stem far enough above the leaf attachment so your stem cutting contains a growth bud. This one on a Nepenthes x Superba is starting to grow.

Stem cuttings from a climbing stem: A) Select a climbing stem that have leaves well separated along the stem. In this case, the plant was N. maxima and the pitches were removed for easier propagation. B) Divide the stem into cuttings. The best cutting is the growing tip. One node cuttings are best taken near the growing tip where the stem material is rather new. Two and three node cuttings are reserved for old parts of the stem that are not quite as vigorous. C) Place the cuttings in a pot with the rooting media and make sure that there is at least one growth node below the soil level. Seal the pot in a plastic bag and place it in an area with bright light but out of direct sun.

Stem cuttings from a basal rosette: A) Select a plant that is not inclined to form a climbing stem. Our victim in this case is the nice Nepenthes hybrid 'Peter D’Amato'. B) Select the cutting site. On this plant, the cut was made between the third and fourth leaves since there was a little more space there to make a cut. C) Make the cut such that about half the leaves remain with the parent plant and half with the cutting. In this case the parent plant retained 4 leaves and the cutting got three. D) Pot the cutting in the rooting mixture (50:50 Sphagnum moss: perlite). Use a wire “U” to hold the cutting in place. The photo was taken right before the wire U and the cutting were pushed down into the pot. E) Seal the pot in a plastic bag to ensure high humidity.
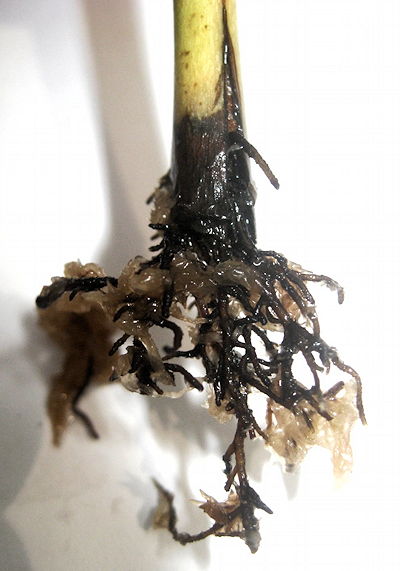
Splitting the end and stuffing it with a little Sphagnum will give more surface area for roots to form.

